Have you tried this irresistible pickle with Methi Thepla?
What is Chunda
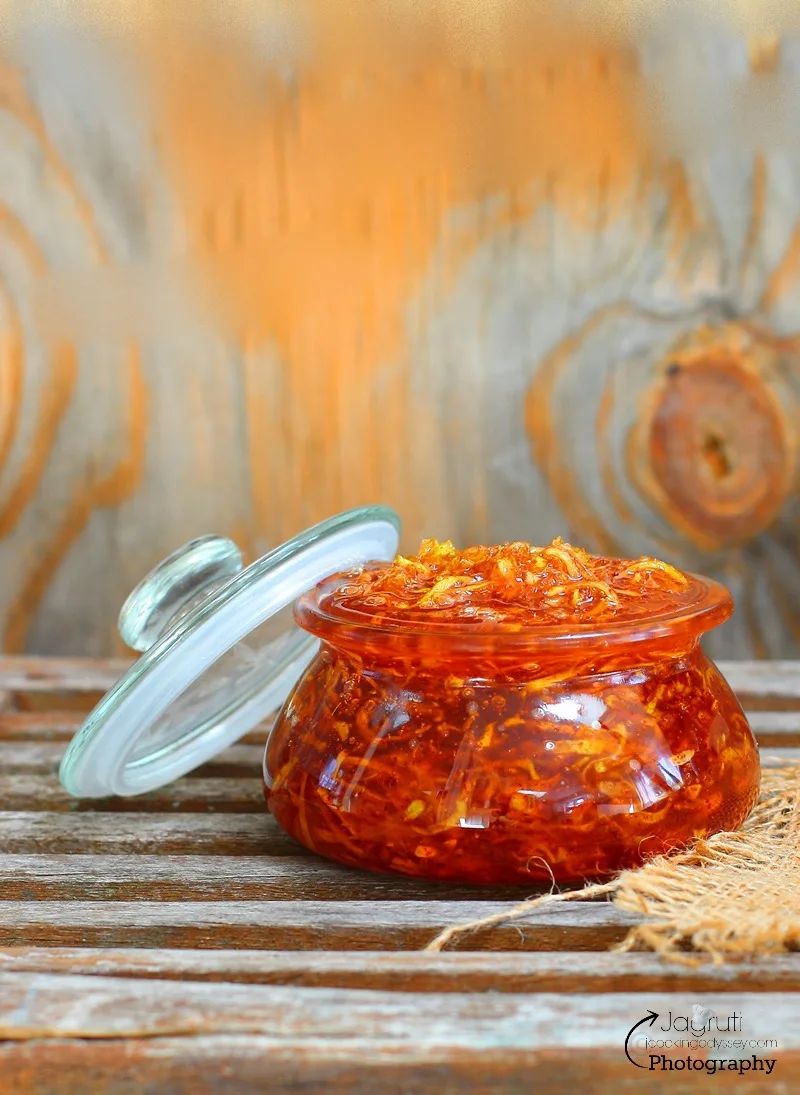
Keri No Chundo is a traditional Gujarati Recipe. Non-Gujarati people call it ‘Aam Ka Chunda’ or ‘Gujarati Chunda’ or ‘Mango Chunda’. This incredibly delicious Gujarati sweet and sour pickle can be found in most Gujarati kitchens and Gujarati Thali. Chundo translates Mashed and in Gujarati lingo, we pronounce Chundo NOT Chunda. Keri No Chundo is a great accompaniment to so many recipes, and this chundo transforms an ordinary meal into something special. Gujarati pickle chunda has all the flavours which your taste buds crave. It is prepared with a handful of kitchen cupboard ingredients such as grated raw mangos, sugar, and chili powder. This chundo is vegan, gluten-free and oil-free pickle (authentic version) and is a must when we travel on a long journey or any road trips with theplas. Aam chunda (mango preserve) requires no pickling liquid such as vinegar. Indian pickles are different than Western pickles. This mango chunda is like a raw mango chutney and has a long shelf life. It is similar to Aam Ka Murabba but this recipe does not use cardamom or saffron. It is made with rajapuri mango which can be found during the mango season. They have a greenish pulp and are less sour mangoes. It adds just the right hint of sweetness, sourness, and spiciness to the meals. Keri No Chundo, some also call it khaman, can be a delightful gift for the ardent pickle lover or many senior citizens who are living on their own and are unable to make it. There are 2 ways of making chundo recipe, the traditional way and the instant version. I have included both methods along with Instant Pot version too.
Ingredients for Mango Chunda
- Raw mango – Raja Puri mangoes are specially used for making Indian pickles. Use raja puri raw mango if possible, if you can not find, any variety will work. Raja Puri mangoes are less sour/tangy thus it is useful for sweet pickles. They also hold up their shape better whilst cooking.
- Sugar – regular sugar works fine. If you wish you can add brown sugar too.
- Red Chili Powder and dried red chilli
- Cumin seeds
- Oil (optional)
- Hing (asafoetida) optional For Traditional recipe (If making it under the sun) you will only required first 4 ingredients.
Traditional Mango Chunda Recipe
My grandma in India always made Chundo in the heat of the sun using the traditional and authentic way where chundo ripens in the heat of the sun and can take up to 8-10 days to prepare. In places like Florida, Texas, California, Nevada and Arizona in America, the sunlight is very harsh and intense. Therefore, chundo can be ready in just 3 days. If you want to learn to make Indian pickles, this is the simplest recipe. This traditional Keri No Chundo recipe is also known as Tadka Chaya No Chundo in Gujarati.
How to make Instant Chunda recipe
You can make instant aam chundo on the stove top as well. Just grate raw unripe mangoes, add sugar, mix it and put it on the stove, check for 2 thread consistency syrup, add spices and voilà! You will have delicious and wonderful quick Chunda recipe in no time, just like you make regular Aam Ki Launji Wash the mangoes, dry with a cloth, peel and grate them. Add salt and leave it for 5 minutes. Squeeze out all the water from it. In a pan heat oil, add hing and dry red chilli. Once is sizzles, add grated mango and mix. Add sugar and mix. Allow the sugar to dissolve on medium heat and simmer till you get two thread sugar syrup. Turn off the heat and add crushed cumin seeds. Now add red chilli powder. Mix well, allow it to cool. Store in a sterilised glass jar.
Instant Pot Keri No Chundo
- Select Saute option, heat oil in the inner pot of Instant Pot. Add dry red chilli and hing.
- Now add grated mango (Wash the mangoes, dry with a cloth, peel and grate them. Add salt and leave it for 5 minutes. Squeeze out all the water from it.)
- Stir for a minute, CANCEL the saute mode.
- Add sugar and keep stirring until sugar dissolves. (it will take less than 2 minutes)
- Deglaze the pot, make sure nothing is sticking on base of the inner pot.
- Secure the lid and position the valve on sealing MODE.
- Pressure cook LOW for 5 minutes.
- Let naturally release the pressure. (15-20 minutes)
- Remove the lid, stir the mixture and let it cool completely.
- Add cumin seeds and red chilli powder, combine well.
- The mixture will go thicker upon cooling.
- Store in a jar.
Chunda Recipe with Jaggery
Jaggery is known as Gud or Gor, although traditional Gujarati chundo is made with only granulated sugar, many prefer using jaggery. Just keep in mind that if you use jaggery, it will lend darker colour to the chundo and alter the taste too. Use the same amount of gor instead of sugar, you may use brown sugar too.
Zero Oil Instant Mango Chunda Recipe
Don’t want to use oil in this recipe? No worries, the good news is that you can make this relish without any oil and still taste so delicious. Just skip the vaghar or tempering (step 3 in a recipe card below) and follow the same method. Tip– In the traditional Gujarati chundo recipe turmeric powder is never added.
Storage
Once it is totally cooled, store keri no chundo in a clean, sterilized glass jar. You can keep it out on the kitchen counter or a cool place atleast for 2 weeks. Or, you can store in the fridge for a month.
Serving
In Gujarati cuisine, chundo is served with plain Gujarati thepla. You may serve with plain whole wheat paratha too. Serve as part of a traditional Indian meal. It tastes especially great with masala puris for a sweety and savory combination! Hope you enjoy this easy, authentic Indian pickle recipe. If you like mango chundo, you will also like aam ka murabba which is made with cloves. You can also make cheese toast with this chundo.
Other pickle recipes
Instant Carrot Green Chilli Pickle Gajar Marcha Athanu As always if you make this recipe, be sure to leave me a comment, rate this recipe and tag me on Instagram @jcookingodyssey or #jcookingodyssey. I love seeing all your photos of my recipe recreations! Don’t forget to follow me on social media using the buttons below – I can’t wait to see you all there!
Instagram Facebook Pinterest YouTube
Note – this recipe was first published in May 2016. This post has since been updated with helpful content and new images. The recipe remains the same.